
The other day, I met my friend for coffee, and we’ve been talking about her WooCommerce trade. She instructed me that once in a while, she hits a wall and in the end finally ends up reusing the identical adjectives for her product descriptions—graceful, nice, stylish—all over a couple of products.
The worst segment? She forever doesn’t understand until so much later, when her store pages already sound repetitive.
As an AI enthusiast, I right away instructed the use of AI to automate the process. Alternatively my friend was once as soon as hesitant on account of she thought connecting AI to her WooCommerce store might be too tough.
That’s after I instructed her to depart it to me. Within sooner or later, I had her WooCommerce store hooked as much as OpenAI.
Now, all her product descriptions are unique, fresh, and written robotically.
When you’ve ever felt stuck writing the identical product descriptions over and over, don’t worry. In this knowledge, I’ll show you my AI tricks to generate WooCommerce descriptions robotically.
Speedy Resolution: Perfect AI Equipment to Auto-Generate WooCommerce Product Descriptions
In a hurry? Proper right here’s a at hand information a coarse overview of the best apparatus to create product descriptions with AI:
- Uncanny Automator – Splendid for larger retail outlets that need whole automation. Connects with OpenAI to robotically generate product descriptions every time you add new products.
- StoreAgent – Absolute best conceivable for newcomers or smaller shops. Generates an AI-powered description for each particular person product.
I’ll walk you via every methods so that you’ll be capable to select the one who fits your store.
Why Auto-Generate WooCommerce Product Descriptions With AI?
Auto-generating your WooCommerce product descriptions assist you to save time, make stronger consistency, boost seo, and make scaling your on-line retailer much more simple.
Proper right here’s the way in which it’s serving to:
- Save hours on information writing: Briefly create product descriptions without taking a look at a blank computer screen.
- Keep descriptions consistent: Every product sounds polished {{and professional}}.
- Boost seo: Robotically include related key phrases to rank higher in search results.
- Reduce repetitive content material subject matter: Avoid the use of the identical words and phrases all over your entire store.
- Scale merely: Generate descriptions effectively, whether or not or now not you’ve were given a few products or a lot.
When I set this up for my friend, she spotted the adaptation right away—her WooCommerce retailer appeared sharper, her descriptions had been consistent, and she or he saved hours every week.
Uncanny Automator vs StoreAgent: Which One Should You Make a choice?
I’m going to cover two methods in this educational. Proper right here’s a at hand information a coarse side-by-side comparison to have the same opinion making a decision:
| Uncanny Automator | StoreAgent | |
|---|---|---|
| Perfect For | Higher retail outlets that need whole automation | Novices or smaller shops looking for a simple answer |
| Setup | Reasonable – requires connecting an OpenAI API key | Easy – guided setup, account introduction, and plugin connection |
| Workflow | Completely computerized recipes run inside the background every time you add products | Product Description AI implies that you’ll be able to generate descriptions for each product in my opinion |
| Flexibility | Extraordinarily customizable – tweak triggers, actions, turns on, and further | Limited possible choices alternatively slightly easy to use |
| Price | Free style available; Skilled beef up really useful for well-liked use | Free style works for plenty of small retail outlets |
Every apparatus have their strengths, so I like to recommend choosing the one who fits your store dimension and workflow. It will most probably moreover depend on how so much control you wish to have over your product descriptions.
What You’ll Wish to Get Started
Previous to I jump into the tutorials, let’s be sure to have the entire thing able. Since each manner works just a bit differently, I’ve broken down the must haves for each.
Approach 1: Uncanny Automator (Perfect for Massive Stores)
| Requirement | Why You Need It |
|---|---|
| WooCommerce store | The ground platform where your products reside. |
| Most sensible price OpenAI account & API key | It shall we the AI generate product descriptions robotically. |
| Uncanny Automator plugin (Free or Skilled) | The free style connects WooCommerce and OpenAI. Skilled unlocks further credit score and sophisticated choices. |
When you haven’t prepare your WooCommerce store however, don’t worry – I’ve got you covered. Observe our step-by-step WooCommerce setup information to get your store able.
Approach 2: StoreAgent (Amateur-Delightful Risk for Small Stores)
| Requirement | Why You Need It |
|---|---|
| WooCommerce store | Your store where AI descriptions will appear. |
| StoreAgent plugin | Comes with Product Description AI agent. It implies that you’ll be able to generate AI-powered descriptions for each product |
| StoreAgent account | To connect your store and get entry to the AI apparatus. |
And in the event you occur to’re no longer positive how you’ll be able to get an OpenAI API key or a StoreAgent account, don’t worry—I cover those steps in detail in each educational.
You’ll be capable to now use the links beneath to jump straight away to the method of your variety:
Approach 1: Automate AI Descriptions with Uncanny Automator (Perfect for Massive Stores)
When you’re working a WooCommerce store with dozens—or even a lot—of products, then manually generating and updating descriptions isn’t affordable. That’s where Uncanny Automator is best.
It’s the highest wordpress automation plugin that connects your WooCommerce store with OpenAI so that product descriptions can also be generated robotically. This may occasionally save you hours of repetitive art work.
It’s in reality the solution my friend ended up choosing for her store, and I’ve totally tested it too. Recall to mind it like Zapier for wordpress—it connects your store to other apps and services and products and merchandise so workflows run on autopilot.
If you want to dive deeper into its choices, then I love to suggest trying out our whole Uncanny Automator overview.
Step 1: Arrange and Activate Uncanny Automator
The first thing you need to do is ready up and switch at the loose Uncanny Automator plugin. This acts as the ground plugin, so even though you go with a peak elegance plan, you’ll nevertheless need the free style installed.
When you haven’t accomplished this quicker than, you’ll be capable to follow our amateur’s knowledge on how you can set up a wordpress plugin.
Very important Remember: Uncanny Automator’s free plan implies that you’ll be able to connect WooCommerce and OpenAI, but it surely for sure comes with a small choice of free app credit score.
Recall to mind a credit score rating as one transfer to run an automation. Each and every time Uncanny Automator generates a product description for you, it makes use of 1 credit score rating.
Once your credit score run out, the automation will pause until you beef up or gain further.
That’s why I love to suggest a top class plan. It’ll provide you with further credit score so as to in reality use the automation ceaselessly and unlock sophisticated choices.
Upon activation, head over to the Automator » Settings » Not unusual internet web page to your wordpress dashboard to enter your license key.
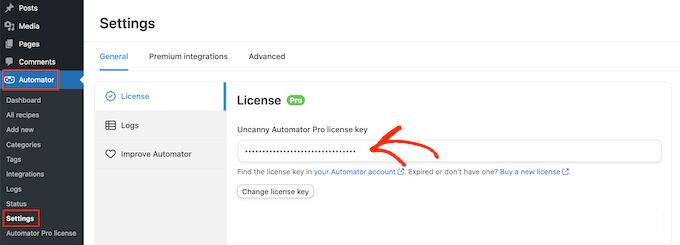
You’ll be capable to to search out this knowledge to your Uncanny Automator account.
wordpress“>wordpress“/>Step 2: Connect OpenAI to wordpress
Next, head over to the Automator » App Integrations internet web page from the wordpress admin sidebar.
Proper right here, you’ll see a list of all of the third-party apps that Uncanny Automator can connect with. Scroll via until you in finding ‘OpenAI’ and click on on on it.
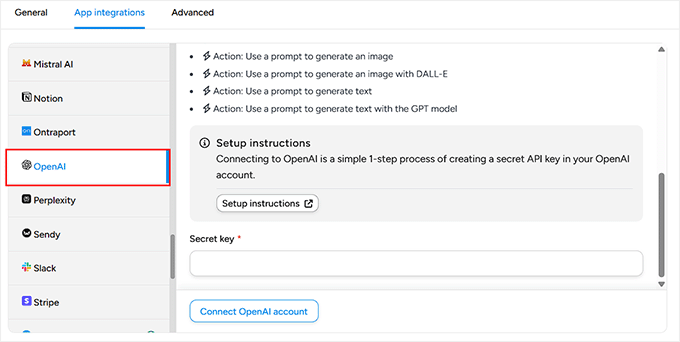
At this degree, the plugin will ask you for a secret key (ceaselessly known as an API key) to attach your OpenAI account with wordpress.
This secret secret’s a singular code that works like a password for apps. Instead of logging into your OpenAI account every time, the essential factor securely lets in wordpress to be in contact with OpenAI inside the background.
To create one, log in in your OpenAI account and switch to the ‘API Keys’ tab from the left column.
Then click on at the ‘+ Create new secret key’ button.
 website.png” alt=”Click the + Create new secret key on the OpenAI website” class=”wp-image-367025″/>
Very important Remember on OpenAI Costs
To use the OpenAI API, you’ll have to have a paid account and add a price manner. API usage is pay-as-you-go, which isn’t the similar as a monthly ChatGPT Plus subscription.
You could be charged only for the tokens you use.
Tokens are small pieces of text—about 4 characters or one fast word. Even if each token costs very little, generating many product descriptions can add up in short.
To avoid surprises, go to Settings » Limits to your OpenAI account and set a monthly spending prohibit.
This offers you whole control over your costs and promises your automation stays inside of price range..
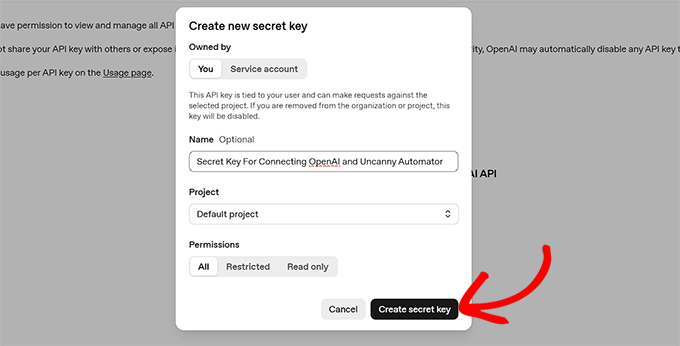
This will open a instructed, where you need as a way to upload a name for the essential factor.
I love to suggest choosing a establish that’s clear and memorable, like ‘Uncanny Automator connection.’ It makes it easier to go looking out in the event you occur to ever wish to edit or delete it later.
Then, go ahead and click on at the ‘Create secret key’ button.
OpenAI will now generate the essential factor for you.
From correct right here, simply copy it into your clipboard.
 website.png” alt=”Copy your secret key from OpenAI website” class=”wp-image-367040″/>
Then go back in your wordpress dashboard and paste it into the ‘Secret key’ field inside the Uncanny Automator settings.
In the end, click on at the ‘Connect OpenAI account’ button.

If the entire thing works appropriately, you’ll see a excellent fortune message confirming the connection.
Step 3: Create a Recipe in Uncanny Automator
Now that your accounts are connected, it’s time to create a recipe.
In Uncanny Automator, a recipe is only a rule that says, “when something happens, do this next.” That ‘something’ is called a reason, and the ‘do this’ is called an movement.
In our case, the reason will probably be together with a brand spanking new WooCommerce product, and the movement will probably be generating a product description with OpenAI.
To start out out, go to the Automator » Add new recipe internet web page from your wordpress dashboard.
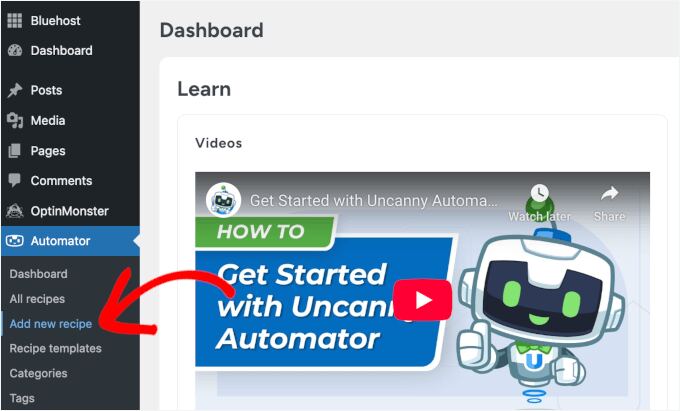
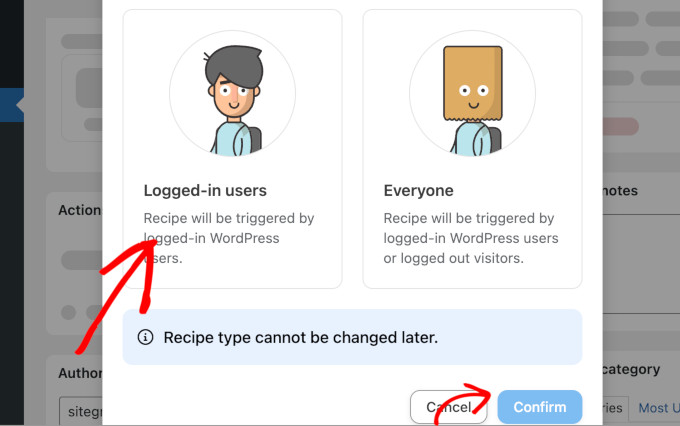
This will open the recipe editor, where the main variety you’ll see is the recipe type: Logged-in shoppers or Everyone.
I love to suggest choosing Logged-in shoppers. This means most straightforward you or your staff contributors (who’re logged into wordpress) may cause the recipe.
Next, add a clear establish to your recipe so that you’ll be capable to merely recognize it later if you want to edit or delete it. Something like ‘AI product descriptions’ works successfully.
Step 4: Set Purpose for Automated WooCommerce Product Descriptions
Once your recipe is named, it’s time to set the reason. To try this, select ‘wordpress’ from the Purpose panel.
Now, it’s worthwhile to be wondering why I’m choosing wordpress instead of WooCommerce.
That’s on account of WooCommerce merchandise are in reality stored as wordpress “posts” inside the backend, so Automator uses wordpress triggers correct right here.
 wordpress-as-trigger-integration.png” alt=”Add recipe title and choose wordpress for trigger integration” class=”wp-image-367046″/>
When you select wordpress, you’ll see a list of possible triggers.
From correct right here, select ‘An individual publishes a put up.’

Then, from the dropdown menu that appears, select ‘Product’ since the put up type.
This tells Automator that the reason should hearth every time a logged-in particular person publishes a brand spanking new WooCommerce product.
After this, simply click on at the ‘Save’ button to ensure your reason.

Step 5: Set the Movement with OpenAI to Auto-Generate Product Descriptions
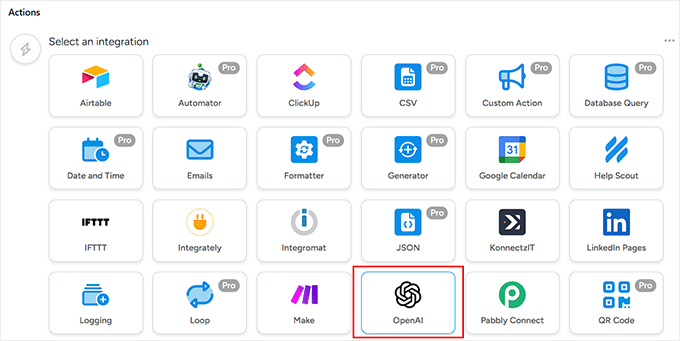
Now it’s time to decide what happens after the reason. For this, scroll correct all the way down to the ‘Actions’ panel and click on at the ‘Add movement’ button.
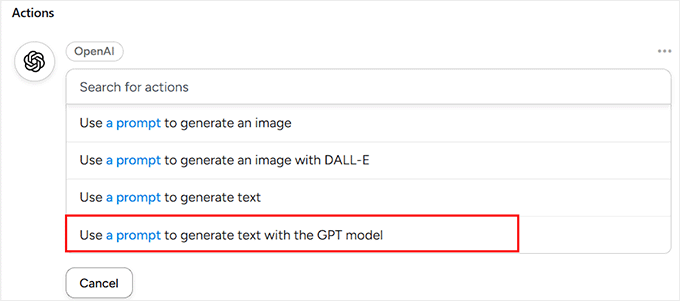
This will open a list of integrations, where you’ll be ready to choose OpenAI.
You’ll now see a list of actions available with this software. From correct right here, select ‘Use a instructed to generate text with the GPT taste.’
This option allows you to write your individual AI advised for some way OpenAI should generate the product description.
Automator will now show you a type where you’ll be capable to configure some settings.
This segment would most likely look just a bit technical to begin with, alternatively don’t worry—I’ll smash it down step by step.
The main selection you’ll see is the ‘Model’. This is merely the style of GPT (the AI engine) that Automator will use. I love to suggest leaving it on the default atmosphere, on account of that’s at all times the newest and most unswerving taste.
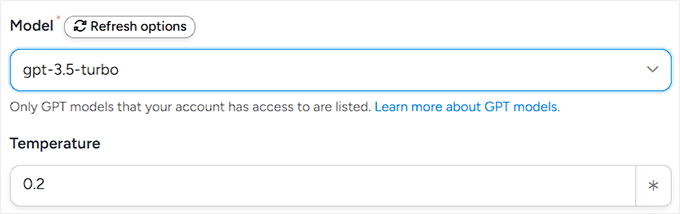
Next is the ‘Temperature’ field. Recall to mind this as a “creativity dial.”
A greater amount (like 0.8) makes the AI further playful and artistic with its wording, while a lower amount (like 0.2) makes it stick to safe, predictable phrases.
For product descriptions, I love to suggest atmosphere the temperature inside the center (between 0.2 and 0.5). This assists in keeping text fresh, engaging, {{and professional}}.
After that, you’ll need to make a choice the ‘Maximum Period.’ This tells the AI how long the product description should be, measured in tokens.
As I covered earlier, your OpenAI API costs are in keeping with what choice of tokens you use. Most WooCommerce product descriptions art work best possible at spherical 250–300 characters.
To make sure the AI doesn’t bring to a standstill mid-sentence, I love to suggest atmosphere your maximum length to 400 tokens. This offers the AI sufficient room to jot down naturally.

Remember: Token counts can also be relatively different in numerous languages, so it’s worth checking OpenAI’s documentation if you have a multilingual retailer.
Step 6: Write the Device Message and Urged
Now that the technical settings are out of the way in which during which, it’s time for the thrill segment—telling the AI how you’ll be able to in reality write your product descriptions. You’ll do this the use of the Device Message and the Urged.
The ‘Device Message’ is like giving the AI a role description. It gadgets the foundations for some way the AI should act when it’s writing.
For instance:
You are a copywriter for [Site name], a store that sells eco-friendly way of living products. Always write in a nice, approachable tone that matches our style.
This way, the AI is acutely aware of to stay on-brand every single time.
To make this easier, Automator implies that you’ll be able to insert dynamic placeholders (or tags) like ‘Internet web page establish’ and ‘Internet web page tagline.’
The ones are different from the OpenAI tokens I mentioned earlier; call to mind them as shortcuts that robotically pull information from your internet web page.
In an effort to upload one, merely click on at the little asterisk icon next to the sector.

Next, you’ll write your instructed. This is your direct instruction for the AI about what to generate.
For instance:
Write a short lived, engaging product description for {{Put up establish}}. Use details like {{Put up excerpt}} and {{Put up content material subject matter (raw)}} to highlight the product’s number one choices. Keep the tone persuasive alternatively delightful.
Proper right here, the put up tokens (like Put up establish and Put up excerpt) will robotically grasp the precise details from each product you add to WooCommerce.
That means every new products gets its non-public unique description without you having to jot down a word.
For instance:
Write a short lived and compelling product description for {{Put up establish}}. Focal point on how the design makes the buyer truly really feel confident and trendy. Highlight key choices the use of persuasive language. Keep it underneath 100 words.
Whilst you’ve written your Device Message and Urged, merely hit the ‘Save’ button.
Automator will now take into account the ones instructions for every new product you place up.

Step 7: Robotically Substitute Products with AI-Generated Descriptions
So far, your reason and number one movement tell GPT to generate a product description. Your next step is to robotically exchange the WooCommerce product with that description.
This step is essential on account of, without it, the AI-generated content material subject matter would exist inside the background alternatively certainly not appear to your product pages.
Connecting the OpenAI response directly to the product promises every new product gets a refined, on-brand description right away.
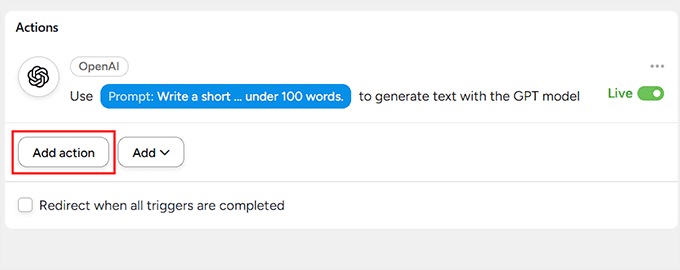
To try this, go to the Actions panel to your recipe and click on at the ‘Add movement’ button yet again.
Then, from the dropdown file, select ‘wordpress’ as your movement integration.
This will display a list of available actions you’ll be capable to perform with wordpress. From correct right here, select ‘Substitute the content material subject matter of a put up.’
 wordpress-action.png” alt=”Choose to update the content of a post as wordpress action” class=”wp-image-367192″/>
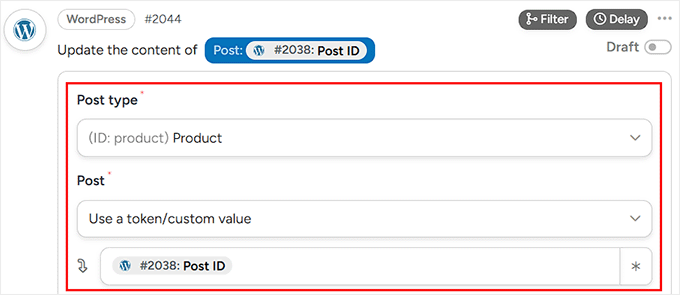
Automator will now instructed you to choose a put up type and a specific put up.
Transfer ahead and select ‘Product’ since the put up type from the dropdown menu. Then, underneath ‘Put up’, select ‘Use a token / custom designed worth.’
Next, you need to click on at the asterisk and add the ‘Put up ID’ token inside the field underneath it.
This tells Automator to concentrate on the fitting product that caused the recipe, ensuring the AI-generated description is added to the correct products.
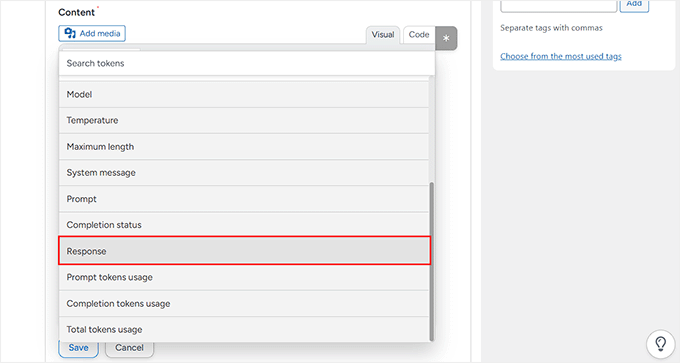
Next, scroll correct all the way down to the ‘Content material subject matter’ field and add the ‘Response’ token from your OpenAI movement. To try this, click on at the asterisk icon inside the top-right corner of the sector and add the token.
This makes positive that each product’s content material subject matter is robotically modified with the AI-generated description.
Once the entire thing is configured, click on at the ‘Save’ button.
To any extent further, every time a brand spanking new product is printed, GPT will generate an overview, and Automator will add it directly into the product.
Step 8: Check out Your AI-Generated WooCommerce Product Description
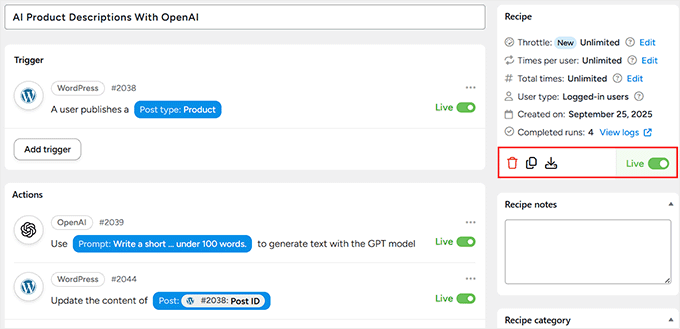
At this degree, your recipe is in a position to go—you merely need to flip the switch. On the right-hand facet of the editor, industry the status from ‘Draft’ to ‘Are living.’
Your automation is now full of life.
Alternatively, quicker than you get began relying on it, it’s a good idea to test problems out.
To try this, head over in your wordpress dashboard and add a brand spanking new product. Give it a establish, price, image, and regardless of other details you most often include, and hit the ‘Put up’ button.
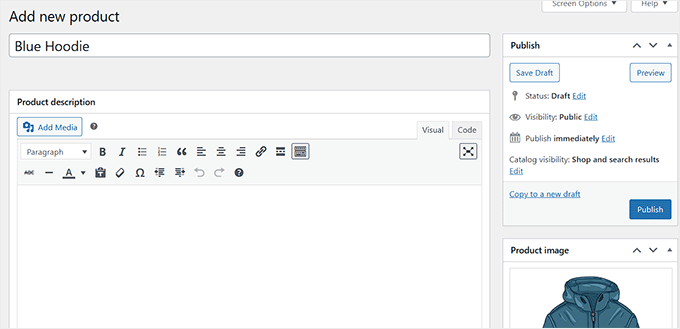
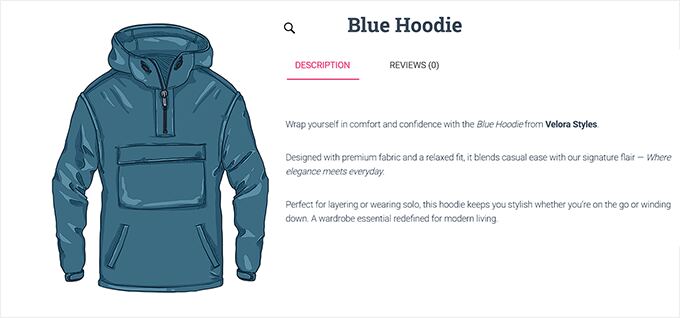
Now visit the product internet web page to your internet website online.
If all is working successfully, then Uncanny Automator contacts OpenAI and generates a modern product description robotically.
Approach 2: Generate AI Product Descriptions With StoreAgent (Amateur-Delightful Risk for Small Stores)
When you’re starting with WooCommerce and need something simple, then StoreAgent is a great selection. It’s an all-in-one AI suite made for WooCommerce.
StoreAgent comes with a ‘Product Description Assistant’ that can generate descriptions with one click on on.
Merely remember that it won’t robotically create descriptions inside the background, in order that you’ll need to open each product and click on on a button.
 website.jpg” alt=”StoreAgent website” class=”wp-image-367185″/>
For smaller online shops, this may in reality be a excellent issue as it’ll provide you with further control and promises you approve every piece of content material subject matter quicker than it’s going reside. Alternatively, Uncanny Automator is a better are compatible for larger retail outlets.
Step 1: Arrange and Connect StoreAgent
First, you’ll need to arrange and switch at the StoreAgent plugin to your wordpress internet website online. When you haven’t accomplished this quicker than, you’ll be ready to check out our tutorial on how you can set up a wordpress plugin.
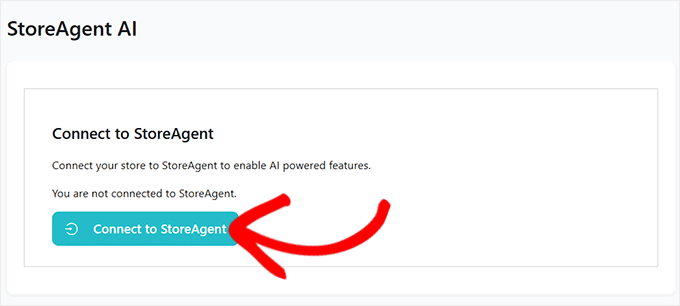
While you flip at the plugin, a brand spanking new computer screen will appear asking you to attach your internet web page with a StoreAgent account. Simply click on at the ‘Connect to StoreAgent’ button.
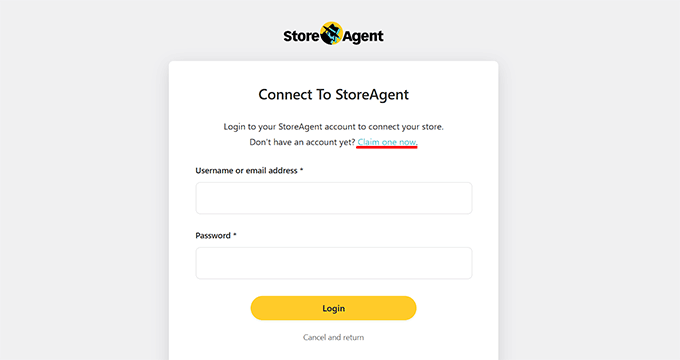
This will take you to the StoreAgent internet web page, where you’ll have to enter your username and password.
When you don’t have an account, don’t worry—you’ll be capable to create one via clicking on the ‘Claim one now’ link.
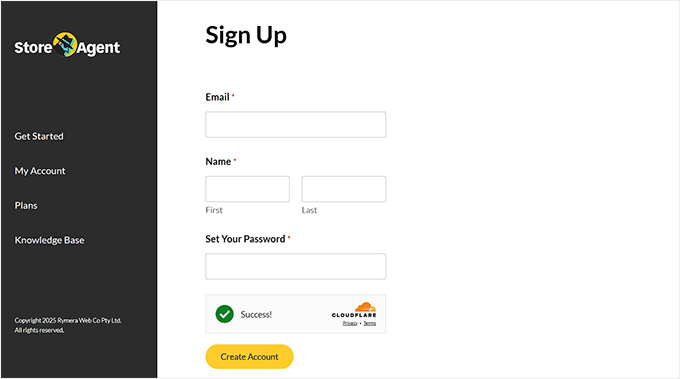
This will direct you to the signup internet web page, where you simply need to enter your electronic mail take care of, establish, and a password.
Whilst you’ve filled it in, click on at the ‘Create Account’ button.
Next, StoreAgent will ask to your internet web page’s URL.
You want to replicate and paste your web site deal with (URL) into the required field and click on at the ‘Arrange Plugin’ button.
 website-url-to-connect-storeagent-with-your-website.png” alt=”Enter website URL to connect StoreAgent with your website” class=”wp-image-367189″/>
You’ll then be redirected once more in your wordpress dashboard. Given that plugin is already installed, the setup will whole robotically.
Step 2: Activate Product Description Assistant in StoreAgent.ai
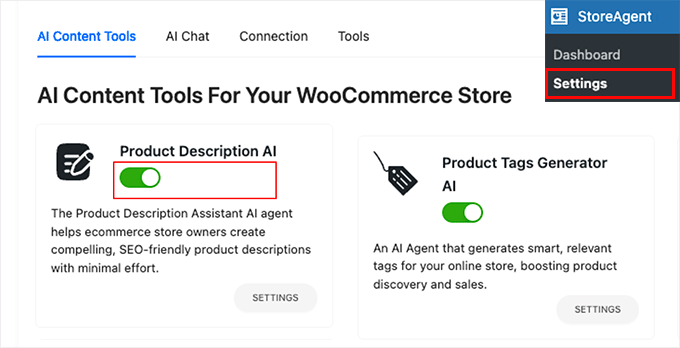
Now, head over to the StoreAgent » Settings » AI Content material subject matter Equipment internet web page from your wordpress dashboard.
Proper right here you’ll see all of the different AI agents that StoreAgent supplies.
Simply to search out the one known as ‘Product Description AI’ and switch it from ‘Inactive’ to ‘Full of life.’
Step 3: Open WooCommerce Product to Generate AI Description
Next, go to Products » All Products to your wordpress dashboard. Make a choice any product you wish to have to switch via clicking the ‘Edit’ link underneath it.
As quickly because the product editor opens, you’ll see a brand spanking new button that says ‘Generate description with AI.’
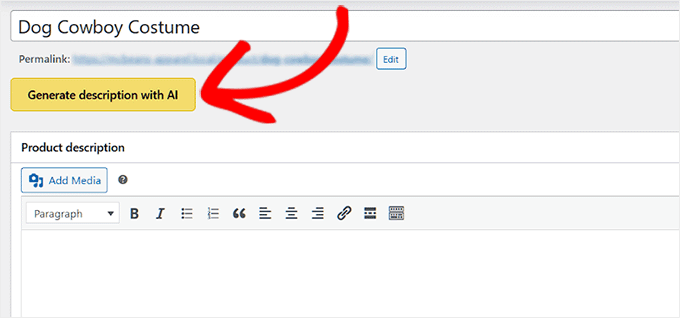
You’ll be the use of this button to let StoreAgent create a product description for you.
Step 4: Customize Your AI Product Description Settings
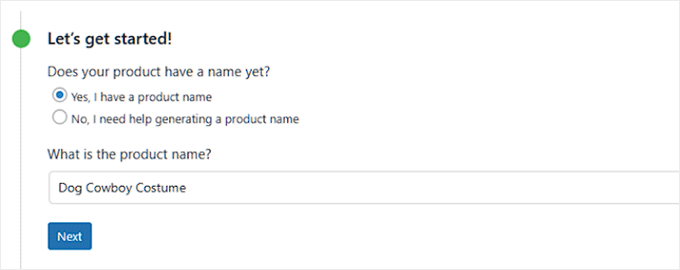
When you click on at the ‘Generate description with AI’ button, a type will pop up asking you to set a few preferences quicker than the AI starts writing.
The ones possible choices have the same opinion StoreAgent understand your product upper and make the description sound merely the way in which during which you wish to have.
The first thing you’ll see is the way to generate a product establish. If your product doesn’t already have one, then StoreAgent can create a establish for you.
It’s no longer at all times easiest, alternatively it’ll save time in the event you occur to’re stuck or want some inspiration.
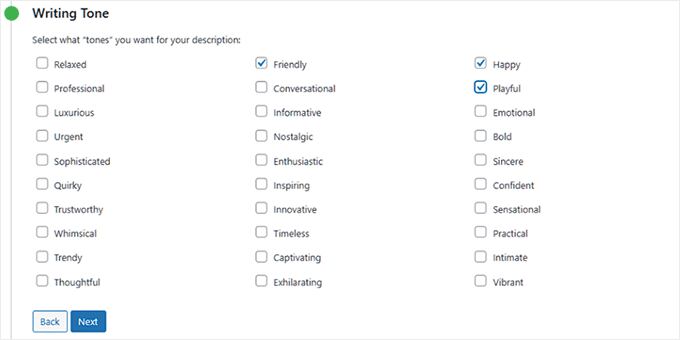
Next is the Writing Tone. That’s the position making a decision how you wish to have your description to sound.
For instance, it’s profitable to make it professional in the event you occur to’re selling trade products, or delightful and inspiring in the event you occur to’re promoting home made pieces.
You’ll be capable to even select more than one tone to combine types and get a result that feels natural in your style.
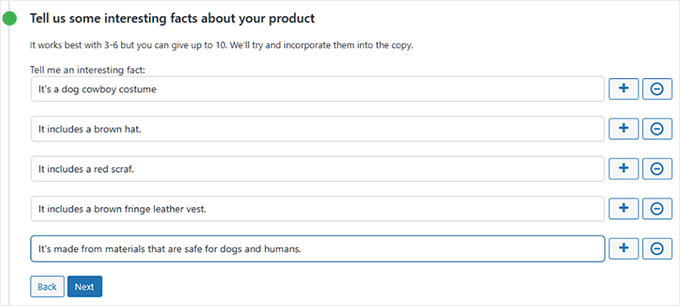
After that, you’ll be capable to moreover add eye-catching information or key details about your product.
That’s not necessary, alternatively I love to suggest filling it in because it provides the AI further to art work with. You’ll be capable to add things like the material, explicit choices, or benefits.
The additional details you percentage, the additional proper and engaging your description will probably be.
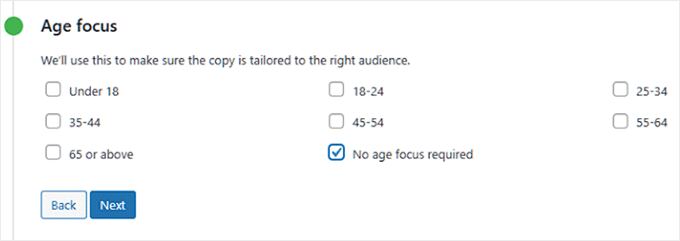
If your product is meant for a specific age personnel, identical to kids or seniors, you’ll be capable to set that inside the ‘Age Focal point’ segment.
If no longer, you’ll be capable to simply select ‘No age point of interest required.’
This tells the AI whether or not or to not tailor the language in opposition to a decided on audience or keep it elementary.
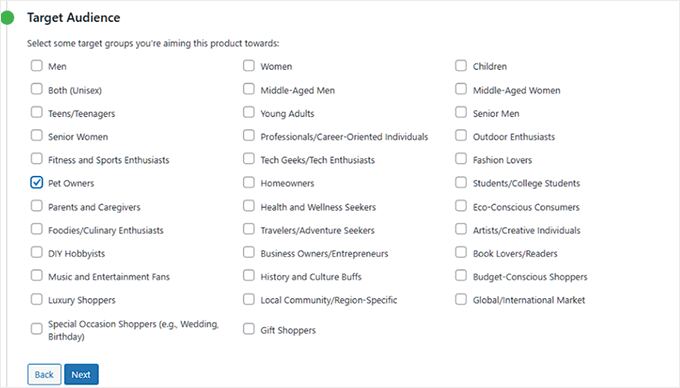
Then, there’s the way to define your target market. Every product has one. For instance, in the event you occur to’re selling a dog robe, your audience might be pet householders.
Selecting the proper audience helps the AI write someway that speaks directly to the parents in all probability to buy your product.
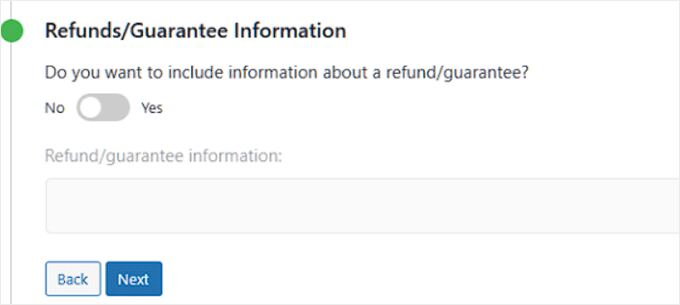
You’ll moreover see a work where you’ll be capable to indicate refunds or guarantees.
If you want to highlight a money-back be sure or a return protection, you’ll be capable to toggle this selection and add the details. It’s a small touch, alternatively it’ll make your description further persuasive.
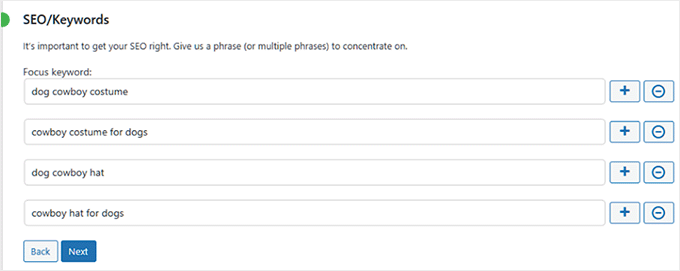
There’s moreover a field as a way to upload keywords. This is useful for wordpress search engine optimization on account of it’ll have the same opinion your product internet web page appear in search results.
Merely type inside the words people are susceptible to search for, and StoreAgent will naturally include them inside the description.
In the end, you’ll be asked to make a choice the description length. You’ll be capable to go for fast, medium, or long.
A short lived description works successfully for simple products, while a longer one is more healthy if your product needs further clarification.
It’s totally up to you, and also you’ll be capable to at all times test different lengths to appear which fits best possible to your customers.
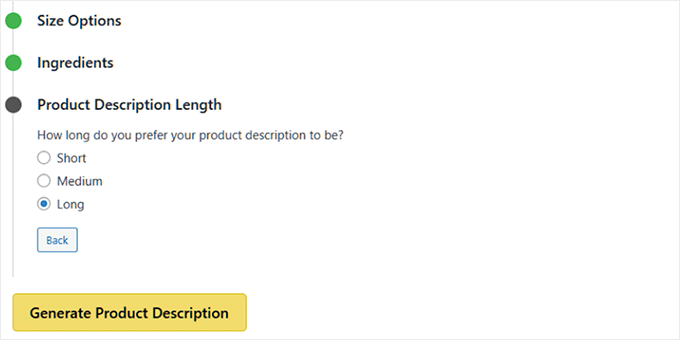
Step 5: Put up and Evaluate AI-Generated Product Descriptions
Whilst you’ve set the entire thing up, click on at the ‘Generate Product Description’ button. This tells the AI to create the description for you.
StoreAgent will immediately generate the text and show it in a popup. From correct right here, you’ll be capable to review what was once as soon as written.
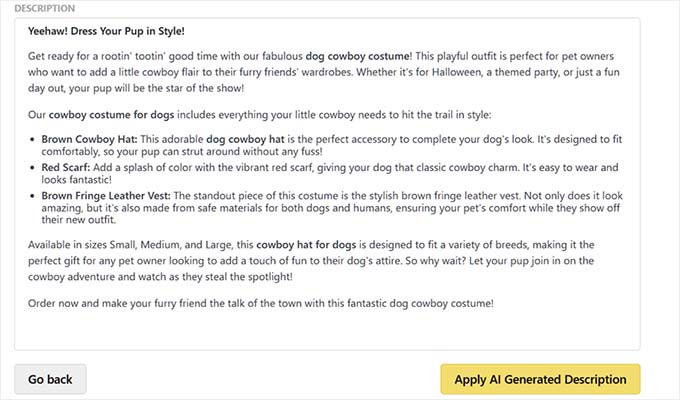
When you don’t like the end result, merely click on on ‘go back’ to control your possible choices and try yet again. When you’re happy, simply click on at the ‘Observe AI Generated Description’ as a way to upload it in your product.
In the end, click on at the ‘Substitute’ or ‘Put up’ button to save lots of numerous your changes and make your product reside.
After that, repeat the process with each product to create its AI descriptions.
Skilled Guidelines for Upper AI-Generated Product Descriptions
Even with tricky AI apparatus like Uncanny Automator or StoreAgent, getting great product descriptions isn’t in relation to clicking a button.
That’s why I like to recommend following the following tips. They’ll be certain that your AI-generated text is proper, persuasive, and fully aligned along side your style.
1. Write clear and detailed turns on
Always include key details like choices, materials, benefits, and related key phrases for products to your instructed. The additional details you include, the additional proper and persuasive the AI’s output will probably be.
Recall to mind it like giving the AI a cheat sheet to look at. For instance, my friend used this instructed for her model boutique:
Write a short lived and compelling product description for {{Put up establish}}. Highlight how the design makes the buyer truly really feel confident and trendy. Include the material and any standout choices. Keep the tone delightful and engaging.
This gave her AI-generated descriptions which were professional, persuasive, and aligned along side her style.
You’ll be capable to moreover give the AI ‘opposed instructions’ to make the output upper. For instance, in the event you occur to to search out the AI forever uses generic words, it’s profitable to add this in your instructed:
Do not use now not atypical promoting and advertising and marketing words like "excellent," "cutting edge," or "game-changer".
For added pointers, check our knowledge on the highest AI activates for bloggers, entrepreneurs, and social media.
2. Keep your style voice consistent
When the use of AI, you need to supply it clear guidance to your store’s tone—whether or not or now not that’s professional, playful, or inspirational. You’ll be capable to percentage examples of your provide product descriptions or style guidelines so the AI doesn’t switch types randomly.
For instance, the identical t-shirt could be described in very other ways depending to your style voice:
- Professional: “Constituted of 100% herbal cotton, this t-shirt supplies a comfortable are compatible and long-lasting top of the range.”
- Playful: “Your new go-to tee for Netflix marathons, coffee runs, and the entire thing in between.”
- Inspirational: “Placed on it as a reminder that simple conceivable possible choices—like a comfortable, eco-friendly t-shirt—may make a big affect.”
Consistency in tone builds trust with customers and makes your products truly really feel cohesive all over your store.
3. Handle AI as your first draft assistant
AI is very tricky, but it surely for sure’s no longer easiest. Always call to mind it as a tool that may get you 90% of the way in which during which there.
Your human touch supplies the overall 10% that promises accuracy, corrects any awkward phrasing, and gives a singular style personality. Always be informed during the generated descriptions quicker than publishing.
4. Use bulk generation appropriately
For retail outlets with many products, generating descriptions in bulk with Uncanny Automator saves time.
Alternatively, at all times spot-check a few items to ensure top of the range and make adjustments where sought after.
Common Issues and Troubleshooting AI Product Descriptions
Even with AI, problems don’t at all times go totally on the first check out. On account of this I wish to percentage solutions to a couple of now not atypical problems you could run into.
Why isn’t my API connecting?
Double-check that your OpenAI API secret’s copied appropriately and pasted into the precise field. Be certain that there aren’t any further spaces or missing characters.
Why are the generated product descriptions too generic?
Your turns on is also too vague. You’ll be capable to include product details, benefits, and style context to make the AI output further specific and engaging.
How do I arrange costs when the use of OpenAI?
Set usage limits or observe your API usage inside the OpenAI dashboard. That is serving to prevent unexpected charges while holding your automation working simply.
Why doesn’t StoreAgent generate an overview robotically for each product?
No longer like Uncanny Automator, StoreAgent calls so that you can click on at the “Generate Description” button for each product. This offers further control alternatively isn’t completely computerized.
Why is the AI once in a while missing product details?
The AI can most straightforward art work with the tips you provide. Be certain that your product establish, excerpt, and any information or choices are whole quicker than generating an overview.
Without end Asked Questions About AI Product Descriptions
Listed here are some questions that our readers forever ask quicker than putting in place computerized AI product descriptions on their WooCommerce store.
How so much does OpenAI price for generating WooCommerce product descriptions?
OpenAI charges in keeping with usage, measured in “tokens,” which can also be small chunks of text. The price is dependent upon the length and choice of product descriptions you generate. You’ll be capable to observe and arrange your usage inside the OpenAI dashboard to control costs.
Do AI-generated WooCommerce product descriptions affect seo?
Now not within the match that they’re well-written. AI-generated content material can rank effectively if it’s unique, comparable, and optimized for keywords. Alternatively, you should at all times review and tweak the descriptions to maintain accuracy and add your style voice.
Can I autogenerate AI descriptions for 1,000+ products?
Certain. Equipment like Uncanny Automator allow for completely computerized workflows, making it easy to generate AI descriptions at scale.
For StoreAgent, you’ll need to generate descriptions product via product, which fits best possible for smaller catalogs.
What if the product descriptions are erroneous?
Always check AI-generated content material subject matter quicker than publishing. It’s conceivable you’ll need to edit it to correct errors and make stronger clarity for accuracy and persuasiveness.
I hope this newsletter helped you learn how to merely auto-generate AI product descriptions in WooCommerce. You might also like to appear our knowledge on how you can routinely generate symbol alt textual content in wordpress with AI or our knowledge on how you can use AI for advertising and marketing.
When you most popular this newsletter, then please subscribe to our YouTube Channel for wordpress video tutorials. You’ll be capable to moreover to search out us on Twitter and Fb.
The put up How I Use AI to Autogenerate WooCommerce Product Descriptions first seemed on WPBeginner.
wordpress Maintenance
[ continue ]
wordpress Maintenance Plans | wordpress hosting
read more